 We were excited to read this recent post from Commercial Integrator about the importance of user-centered design in AV solutions. User-centered design is a successful collection of techniques with a long history in product and software design, and AVIXA and others are drumming up awareness in the AV space.
At Aveo Systems, we are strong believers in user-centered design. Our cloud-connected control system for collaboration spaces, Mira Connect, is a great example of the result of this process. We created this product through iterative design and testing cycles, adhering to the core principles of “know the user” and “know the task”.
In this post, we examine five of the crucial steps in user-centered design and explain how we applied each to the design of Mira Connect.
1) Research
Research uncovers details about who is using the collaboration space and how they are using it. This is best done by asking and observing, which may include:
- Interviewing or surveying users
- Getting permission to directly observe users as they perform real tasks
- Exploring user feedback and analytics gathered from existing solutions
Understanding the end-users and their goals is the most important component of user-centered design. For Mira Connect, we consulted both end-users, who are using the control aspect of the product, and AV integrators, who are using the configuration and management aspects of the product.
At Aveo Systems, we think of the research stage as clarifying the what of the problems our users want to solve, as in, “What are the users’ goals in the collaboration space? What problems do they face along the way?” This defines a list of goals that can be met through the features and workflow of the product.
As an example, one group of users we consulted for Mira Connect was highly concerned with the privacy of their meetings: they had a primary meeting room with an adjoining overflow room which could have meeting audio routed to it, as well as an inductive assistive listening loop, which could have audio routed to wireless headsets. In a sensitive meeting, they wanted to ensure that no one outside the primary meeting room could inadvertantly hear the meeting audio. We kept this concern firmly in mind as we continued on to the Ideation step in the design process.
2) Ideate
Brainstorming, as ideation is known in everyday language, is intended to broadly explore the set of possible solutions to a problem.
At Aveo Systems, we call the ideas generated in this phase the how of a solution, as in, “Howspecifically might we solve this user’s problem?” It is great to have as many potential solutions as possible in this brainstorming phase because many don’t make the final cut, but they often evolve into better ideas.
It is also crucial to have the what soundly identified in the Research step before jumping into Ideation. Without truly understanding the nature of the problem we are trying to solve, it could be easy to let the how (e.g. a particular technology or way of doing something) prescribe the product’s features, potentially missing a solution better matched to the user’s goals.
Continuing our example from the Research step: we knew that some Mira Connect users wanted to ensure the privacy of the meeting room. We considered a variety of mechanisms, including some we had seen in other control systems designs: mute indicators and controls for each audio route, or a special “privacy mode” that overrides all mutes for audio routes, among others. We hit upon a variation on the theme of muting control by turning the question around to “Who can hear me?” Since this was the information our users really wanted, we knew that our display should clearly present it. At this point we took some of these ideas into the Prototype phase.
3) Prototype
The purpose of a prototype is to quickly and cheaply explore the hows from ideation. Rather than building a real, working solution and hoping it meets user needs, we mock up a representation of how the solution is intended to work and evaluate that with real users. Typically, these prototypes are created to answer simple questions, such as the wording of menu items, icon interpretations, or navigation features.
There are many ways to approach this phase, but the most simple is to individually walk a handful of users through real-world scenarios on the prototype. A prototype can include visual representations (e.g. drawings or mockups) of any display screen that users would see or interact with, and might include stand-ins for tablets, PCs, or even cable connections that might be part of the intended solution. These mockups can be as low-fidelity as paper renderings on the table or taped to a screen, or as high-fidelity as an interactive image on a display. One can simulate interactivity by asking users to touch the mockup to indicate taking an action and then manually flipping to another image.
It is important to use real, representative users for this testing: your AV co-workers may have knowledge a real user does not (or vice versa). It is also important to pose representative problems to these users: “Dial a call” will not provide as many insights as “You have a scheduled meeting with a team member. Use the contact information in your calendar to dial the call.” The types of users and representative scenarios should have been identified in the Research step.
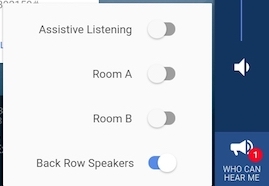
To explore our Mira Connect example of answering the “Who can hear me?” question, we constructed a few variations on the basic design of a popup menu accessed by an icon button. The icon button indicated the number of routes (such as assistive listening or an overflow room) that could hear the current room, or provided a “mute” indicator if none of the routes could hear the current room. We iterated on the icon and label for the button and the content and style of items in the menu.

‘Who can hear me’ icon with four items enabled

‘Who can hear me’ menu open with four items enabled

‘Who can hear me’ menu open with one item enabled

‘Who can hear me’ icon with no items enabled
Testing with prototypes allowed us to rapidly iterate our design without the cost of revising code. By adjusting the prototypes, we zeroed in on the most usable designs that met the goals of the users.
4) Evaluate
Though some evaluation is done in the Prototype stage, evaluation of the full design is always revealing. Again, we choose representative tasks ahead of time and test our design with real users. We measure at multiple levels, from simple to more complex questions:
- Did the user succeed?
- How long did it take them?
- What unsuccessful paths did they go down before success?
- If they failed, why?
Looking for commonalities in the failures between users quickly identifies root causes: the Nielsen Norman Group predicts that testing with 5 users will find 85% of the problems in a design. Armed with these data, we can update our design and prototype, and test again to verify that the changes improve our metrics.
In the case of our Mira Connect “Who can hear me?” menu example, our evaluation took place at several points in time. In early phases of the design, we evaluated details like icons and text with input from users via the web. Later, as the design took on a more clear form, we provided mock-ups to users for evaluation via real tasks: “You are having a private meeting; how can you be certain no one else might overhear?”
If a task is particularly complex, for example entering meeting codes for an audio bridge, there should be cycles of Prototype and Evaluation phases. In some cases, we may even return to the Research or Ideate stages to solve an emergent issue identified by our user testing.
5) Launch
We see the launch of a product as both an end and a beginning. Deploying Mira Connect to a multitude of users opened up additional avenues of user feedback and data analytics. As users continue to explore Mira Connect, they see the potential for new features that could help them achieve their goals. We collect user feedback and usage analytics, and the entire user-centered design process begins again to make sure that any new features will be well-integrated, keeping the experience seamless for old and new users alike.
The Mira Connect Payoff
As you can see, a lot goes into the user-centered design process. We’ve put this effort into Mira Connect by building a high-quality user experience focused on end-user control of a collaboration space, as well as administrator management and monitoring of AV equipment.
We think Mira Connect can save AV integrators the substantial effort of conducting their own user-centered design work, preserving their valuable time and knowledge for the other crucial aspects of creating a successful collaboration space.
Learn what Mira Connect can do for you and your end-users!
Posted from the AVEO Systems website blog, located here: https://aveosystems.com/mira-connect-user-centered-design/
